Open Source on Azure: Dive into Drupal #3
CI-CD: Rinse & Repeat into Azure
This is the last of a 3 part article on exploring Azure, Drupal & DevOps through a new website project for the Hampton Hill Theatre.
This post follows on from Part 2 Drupal & DevOps: Choose your weapons looking at tools needed to develop Drupal and set up Azure app services.
Let's finish off the series by automating the deployment of the Infrastructure and Drupal with pipelines.
Infra as Code: Stand it up

What is Infrastructure as Code (IaC)?
IaC is the process of defining and managing your IT infrastructure as code instead of point & click in a browser.
This may sound over the top but it has proven benefits and plays a key role in DevOps.
IaC allows you to build, change, and manage your infrastructure in a safe, consistent, and repeatable way by defining resource configurations that you can version, reuse, and share - HashiCorp
There is confusion over Infra as Code and Config Management as Code, on the surface they appear to do the same thing. The definition and popular tools for each are shown below:

Drupal has it's own Configuration management system where active config is stored in the DB and can be imported & exported via YAML files (completely seperate from website content) under source control.
In this article we will focus on IaC for Azure.
Tools for the job
There are a few choices for IaC:
- Terraform - open-source & multi-cloud ✅
- CloudFormation - vendor native for AWS ❌
- ARM Templates/Bicep - vendor native for Azure ✅
- Google Cloud Deployment Manager - vendor native for Google Cloud ❌
- Pulumi - open-source, multi-cloud & choice of language 🤔
Terraform is hot property right now and with some previous training on it I was keen to learn more.
CloudFormation & Google Cloud Deployment Manager were out as you cannot deploy to Azure with them.
ARM (Azure Resource Manager) templates can now be written in Bicep (domain-specific language) which I had dabbled in so this looked promising.
Pulumi on paper looks the best, as you can write your code using Node.js, TypeScript, Python & .NET Core runtimes. The steeper learning curve ruled this out but definitely one to watch!
So this narrowed it down to 2.
Head to Head

There are lots of in-depth articles out there on this so I'll keep it high level:
| Bicep | Terraform (TF) | |
|---|---|---|
| Azure support | Day 0 & Microsoft | Provider updates & community |
| Multi-cloud | No | Yes |
| Language syntax | Declarative, easy to read | Declarative, easy to read |
| Command Line | Azure CLI | Terraform CLI |
| Deployment | Azure Resource Manager | Desired State Configuration (DSC) |
| Preview changes | Preflight validation | Terraform plan |
| VS Code extension | Very good | Needs improvement |
| Azure Pipelines | Installed on agents | Need to install |
Azure support
Bicep has Day zero support for all Azure resources so there is no delay in any new releases. You can raise a ticket if you have a paid MS support plan. TF uses its provider for Azure which HashiCorp keep updated and (like Drupal) support is through the open-source community.
Multi-cloud
Bicep is only for Azure, whilst Terraform can be used on Azure, GitHub, AWS, Google Cloud Platform, Kubernetes, Oracle, AliBaba etc. TF has a much wider scope and can do things like create GitHub repos for you.
Language syntax

Both are declarative, easy to read & learn if you have some programming experience. Quick snippets below on creating an App Service Plan.
Bicep
resource appServicePlan 'Microsoft.Web/serverFarms@2020-06-01' = {
  name: 'example-appserviceplan'
  kind: 'linux'
  location: resourceGroup().location

  sku: {
    name: 'B1'
    tier: 'Basic'
  }
}
Terraform
resource "azurerm_app_service_plan" "example" {
  name                = "example-appserviceplan"
  kind:               = "Linux"
  location            = azurerm_resource_group.example.location
  resource_group_name = example-resources

  sku {
    size = "B1"
    tier = "Basic"
  }
}
They have very similar syntax, both examples get the location from the parent resource group. Bicep requires the API version spec @2020-06-01 which TF already defines when you set up the provider as below.
# Configure the Azure provider
terraform {
  required_providers {
    azurerm = {
      source  = "hashicorp/azurerm"
      version = "~> 2.80"
    }
  }
Command Line

Bicep is integrated with the Azure CLI, its commands can be run alongside others when deploying, e.g:
az bicep build/decompile/upgrade
Terraform CLI can be installed and run anywhere e.g:
terraform init/plan/apply/validate/destroy
Deployment
Bicep generates ARM templates which default to incremental deployments, meaning it will only add or modify resources in the scope (e.g resource group). Using complete mode lifts the guard rails so anything not in the template will be destroyed. The current state of the environment is managed by Azure.

Terraform uses desired state configuration (DSC) so whatever is defined in the TF file will be replicated in the target environment (same as complete mode in Bicep). The .tfstate file is the source of truth so it needs to be managed securely and safely (ideally remotely in Terraform Cloud or Azure storage).

The difference here is initially Bicep is more robust as resources cannot be accidentally deleted but this can lead to configuration drift whereby the state in the code does NOT match whats on the live infrastructure.
Bicep also does NOT have a matchingterraform destroy command yet, so to remove everything from the resource group you would have to use complete mode and remove all definitions. Deployment Stacks are planned to sort this out.
Preview changes

Previewing changes before modifying cloud infrastructures is essential for IaC.
Bicep does preflight validation using the Azure CLI.
az deployment group validate checks the template will succeed and avoids any incomplete state.
az deployment group what-if compares the desired state in your bicep file to the current state and prompts you to approve.

The terraform plan command creates an execution plan by reading the state file and comparing with the current infrastructure. Similar to above it then shows you what will be changed which can be confirmed with terraform apply.
VS Code extension


The Bicep extension has code completion, IntelliSense and a visualiser showing resources & dependencies.

HashiCorp also provide an extension which needs some improvement.

Azure Pipelines
In this project we will be using Microsoft hosted agents which Bicep CLI is pre-installed on. There are some Bicep pipelines tasks now available on the ADO marketplace.
Terraform is not installed on the agents so an ADO TF extension would need to be installed first e.g this very popular one.
Verdict

For this project as we are using Azure DevOps & Azure PaaS it makes sense to go with Bicep. If we were deploying to multi-cloud or with a team experienced in Terraform, then that would be the best option.
Heavy Lifting with Bicep

For this project the IaC is simple, an App Service Plan and x2 App Services are needed to host the website. The MySQL VM was already created so will be retro fitted to IaC at a later date.
The Bicep files go in the same git repo as the Drupal application in their own 'infra' folder. The main.bicep is the starting point and is the file that is transpiled to an ARM template (main.json) for deployment.

Using a modular approach the main file passes parameters into appService.bicep which creates the resources and passes back output variables. The parameters.{env}.json files are used in the Azure pipeline later to override default parameters in main.bicep at runtime.
We won't go through all the code steps here but you can find excellent content on MS Learn. One useful feature was using a configuration map to change the tier and tags of the App Service Plan based on the passed in environmentType parameter. So the dev environment can use the Free tier to save on costs.
// Define the app service plan sku, tier & capacity/instances based on the environmentType param
var environmentConfigurationMap = {
  Dev: {
    appServicePlan: {
      sku: {
        name: 'B1'
        tier: 'Basic'
        //name: 'F1'
        //tier: 'Free'
        capacity: appServicePlanCapacity
      }
      tags: {
        Environment: 'Development'
        Client: clientName
      }
    }
  }
  Prod: {
    appServicePlan: {
      sku: {
        name: 'B1'
        tier: 'Basic'
        capacity: appServicePlanCapacity
      }
      tags: {
        Environment: 'Production'
        Client: clientName
      }
    }
  }
}
// set the sku based on the environmentType from the config map
sku: {
name: environmentConfigurationMap[environmentType].appServicePlan.sku.name
tier: environmentConfigurationMap[environmentType].appServicePlan.sku.tier
capacity: environmentConfigurationMap[environmentType].appServicePlan.sku.capacity
}
Put it in the Pipe

Next up is automating the Infrastructure and Drupal build in a Continuous Integration (CI) AKA Build pipeline.
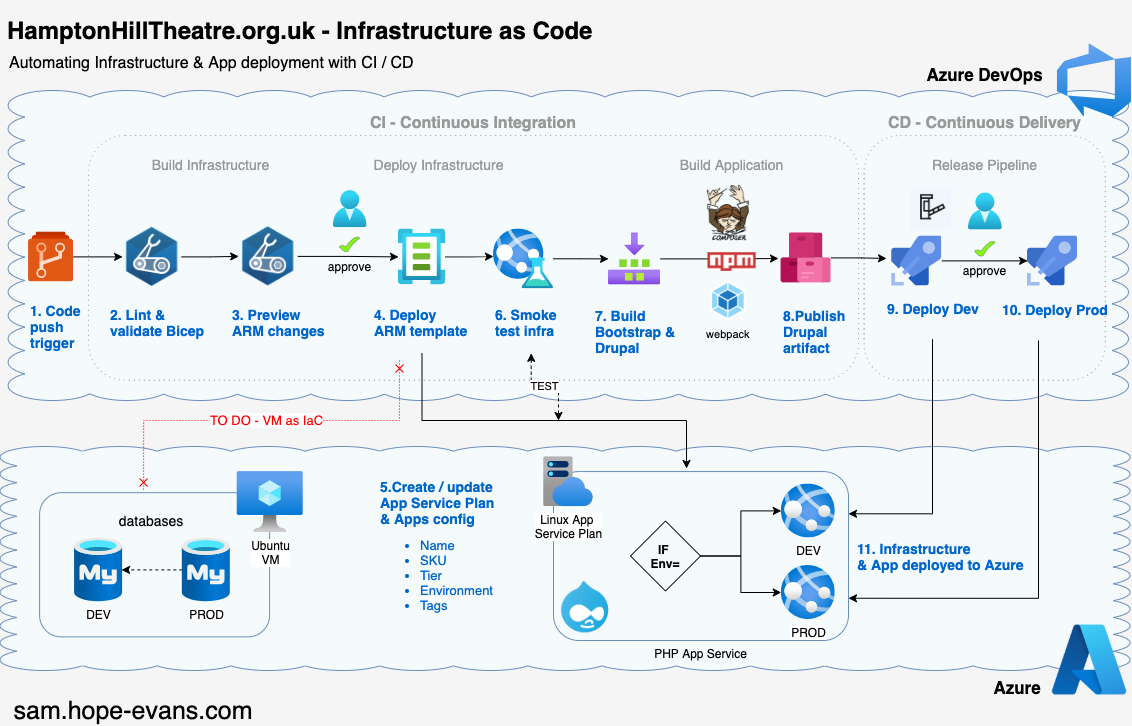
CI is the process of developers merging/pushing code into a Git repo which then triggers an automated build to run. In this case after a push to the repo the below 6 stages are run.

Using all these stages 'shift left' the testing and quality control to earlier in the development lifecycle. The earlier any issues are found the faster and cheaper it is to resolve them.

Once the CI pipeline is out in the wild it becomes the only way that changes can be made to our Azure infrastructure and Drupal code. This enforces quality checks before, during and after deployment.
Azure DevOps provides Microsoft hosted agents/runners with 1800 free minutes / month for pipelines runs. It spins up a VM for you to run the build on, when done it tears it down.

As mentioned earlier Bicep is installed on the Ubuntu agent we use, as is Composer and NPM, this speeds up the CI process big time.
Break it down

The 5 Infra stages above use job and steps in an Azure Pipeline YAML file.

-
Lint: this ensures the Bicep file is OK and our linting rules pass when we run:
BicepFile=$(infraFolder)/main.bicep az bicep build --file $BicepFile -
Validate: this kicks off the ARM preflight validation to ensure the deployment won't fail by using the built in AzureCLI@2 task and running:
az deployment group validate -
Preview: we can preview the changes to the Infra by using:
az deployment group what-ifand then apply a manual check using Approvals in ADO environments.
-
Deploy: Using a built in task we deploy the ARM template and print output variables when done.
- task: AzureResourceManagerTemplateDeployment@3 name: DeployBicepFile displayName: Deploy Azure build $(Build.BuildNumber) to $(geoLocation) -
Smoke Test: We run some post-deploy checks (using PowerShell and Pester) against the Infrastructure to make sure nothing is burning.

Fun & Games with output variables
Well not really.
We needed to print the variables to screen and pass the AppService Hostname to the Smoke test stage. Setting the output var with all the deployment JSON didn't work using the AzureCLI@2 task as the value was always null (although you could set 1 property OK).
So instead I used the AzureResourceManagerTemplateDeployment@3 with it's deploymentOutputs property, followed by a custom PowerShell task to print out to screen, set the variable:
Write-Output "##vso[task.setvariable variable=outAppServiceAppHostName;isOutput=true]$value"
and then access it in the Smoke test stage:
variables:
    outAppServiceAppHostName:
    $[stageDependencies.Deploy.DeployAppServices.outputs
    ['DeployAppServices.ConvertArmPS.outAppServiceAppHostName']]
So the results of the Smoke test would then show up on the report in ADO:

Building Drupal

With the Azure infra deployed and tested the final stage of the CI pipeline is the Drupal build.
This has x1 job made up of 8 steps/tasks, automating this saves alot of time.
As mentioned in the last post Drupal has front and back end package management so Composer, NPM and WebPack tasks had to be run to ensure the PHP and Bootstrap dependencies were compiled and ready.
To secure the pipeline a WhiteSourceBolt tasks gets run which reports security vulnerabilities and license risks. This helps to start a DevSecOps model.

The CI pipeline produces artifacts ready for the CD pipeline coming up next...
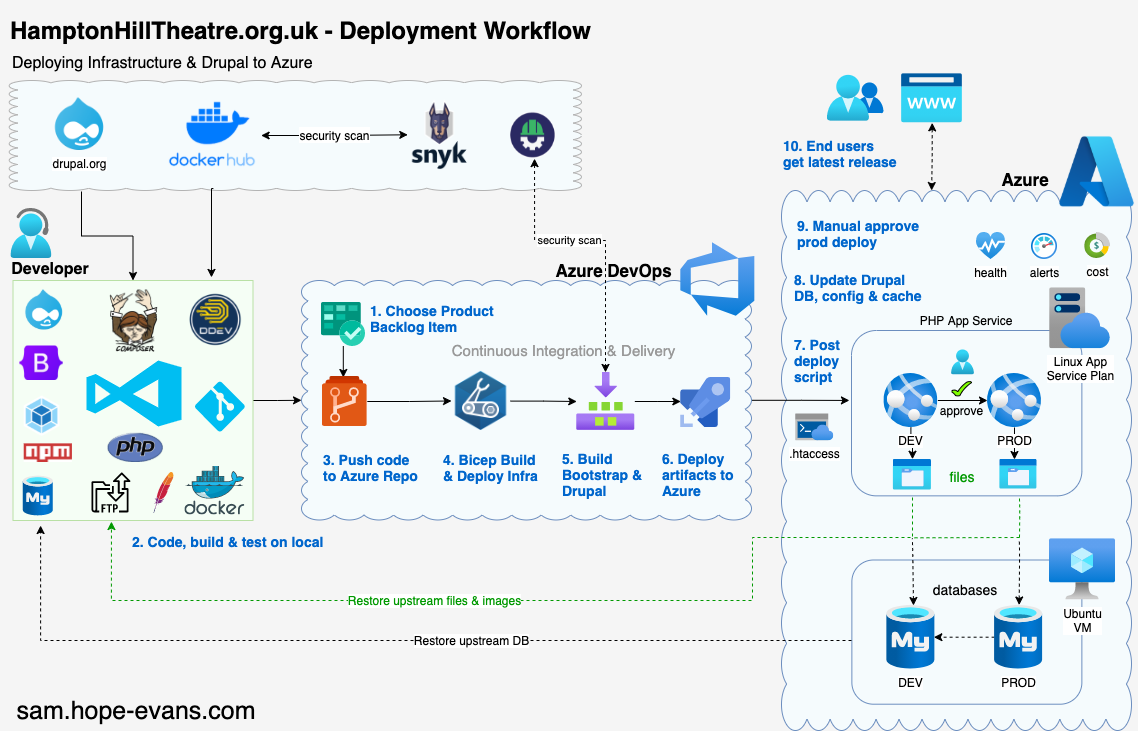
The Big Picture

Release me

Now we have the Azure infra stood up and Drupal artifact built, it's time to deploy with a Continuous Delivery (CD) AKA Release pipeline.
* Latest best practice - add a release stage in the YAML CI pipeline, in this example we use the Classic Release pipeline GUI.
When the CI build is finished this automatically triggers the release pipeline. The first stage is to deploy to the Dev App Service:

You can view linked commits, work items and check logs for any issues.

Through the Gates
You can add both Pre & Post deployment conditions to the stages.
The Development stage has 2 Post-deployment Gates triggered after an OK deploy:
- Checks Azure Policy compliance (valid resource tags)
- Runs an ADO query for active bugs

If either of these fail...


These automated gates add extra confidence in the release process. Once any fixes are made the release can be triggered again manually:


Finally, a pre-deployment approval is added to the Production stage for a human Go/No Go sign off for live release.
The Bigger Picture

Wrap up
That's it for this series!
Hope you've made it this far and enjoyed the read.
We have checked out all the tools needed to build the Drupal site, use version control, spin up Infrastructure as Code and automate the deployment into Azure.
There are so many areas (containers, security, drush etc) in which this architecture can evolve and improve, so look out for more posts on this Blog.
As Boromir says...


