Code Scanning a GitHub repo using Azure Pipelines
For the last 6 months I have been really busy working in a fantastic new job with GitHub as a Solutions Engineer 😊!
Disclaimer: this is a personal blog post and not endorsed by GitHub
As the Digital frontier for code in the cloud we onboard customers across the globe to all the evergreen software development features GitHub has to offer.
In this blog post I will show how you can integrate GitHub Advanced Security code scanning into an Azure DevOps pipeline.

GitHub Advanced Security
With DevSecOps becoming the de-facto approach for any modern enterprise, GitHub Advanced Security (GHAS) is an essential product to secure every step of the SDLC, from supply chain through to code & secret scanning.
I recently passed the GitHub Advanced Security certification exam to consolidate all the theoretical knowledge alongside real world experience.

Code Scanning
One of the core features of GHAS is Code Scanning, this effectively scans your static code on push, pull request or schedule for exploitable vulnerabilities and integrates the results natively into the developer workflow.
Code scanning is available for all public repositories on GitHub.com. It is also available for private repositories owned by organizations that use GitHub Enterprise Cloud and have a license for GitHub Advanced Security.
The easiest way to get started with Code Scanning is to use GitHub Actions, the boilerplate YML workflow auto detects the language in the repo and uses a default query set to scan your code for vulnerabilities. This scan executes on the GitHub hosted runners which are spun up and teared down when the workflow is run.
Hold up!...I use Azure DevOps

Many GitHub users come from the Azure DevOps (ADO) world and have invested time in building Azure Pipelines for their CI so might not be ready to jump straight into using Actions just yet.
In this case you are 100% covered as GitHub Advanced Security allows CodeQL code scanning in your CI system.
The caveat is that the code must be stored in a GitHub repo (not in Azure Repos or other 3rd party VCS).
GitHub & ADO Integration

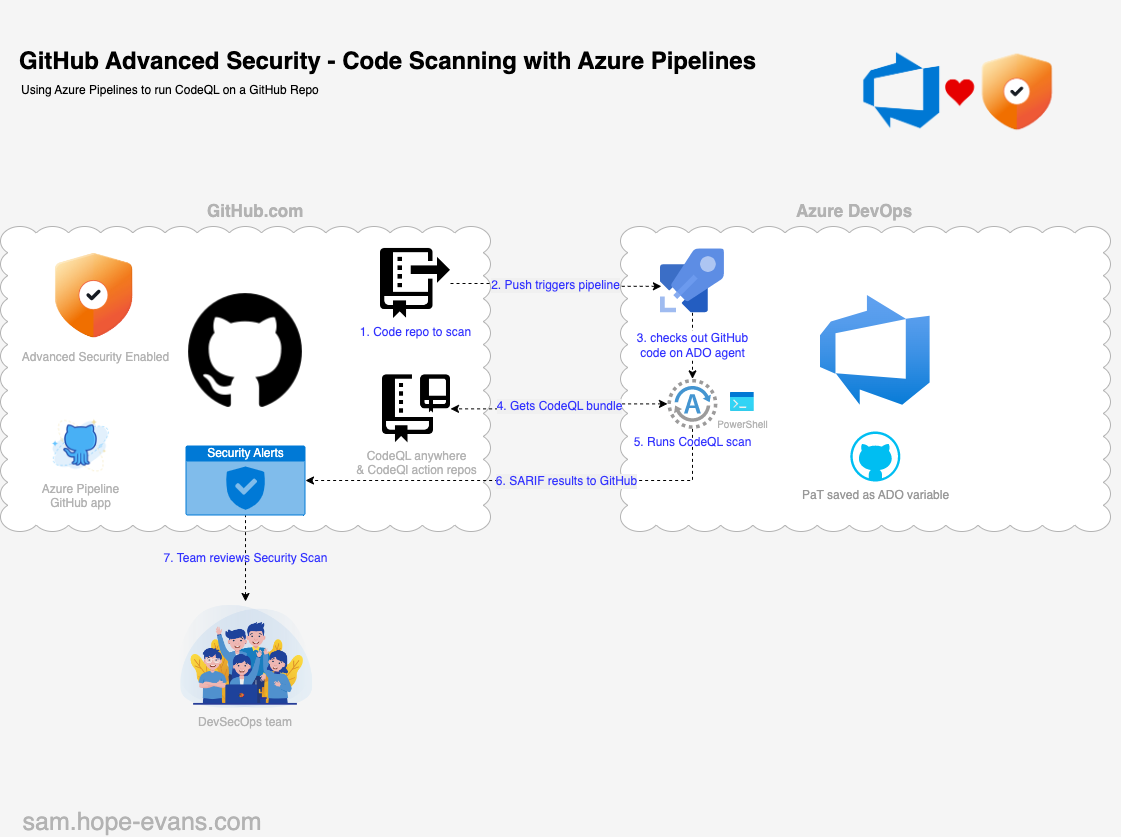
We will now walk through setting up Code Scanning a NodeJS app in a GitHub repo using Azure Pipelines CI to run the CodeQL job.
Once complete the results will resurface back in the GitHub repo under the Security tab for review and remediation.
The main steps are:
- Push to GitHub repo triggers the Azure Pipeline
- Check out the code on a ADO agent / runner
- PowerShell task integrates David Wiggs's CodeQL Anywhere
- Run CodeQL scan & create database
- Upload SARIF results back to GitHub
What you need

- GitHub Repo: public or private (needs GitHub Advanced Security enabled)
- Azure Pipelines GitHub app: to allow ADO access to the GitHub repo
- Azure DevOps project: YML pipeline created
- GitHub PaT token: (repo & security events scope) saved as an ADO pipeline variable
The links above for the public GitHub repo and ADO project can be used to get started.
GitHub Repo with Advanced Security
First, set up your GitHub code repo for Code Scanning.
If it is a public repo then this is enabled by default, if it is a private or internal repo then you will need to be using GitHub Enterprise Cloud and have a license for GitHub Advanced Security.

If enabled you should be able to see the security tab and Code Scanning menu as below👇

GitHub App - Azure Pipelines
In order for your ADO pipeline to checkout the code in the GitHub repo you will need to set up the Azure Pipelines GitHub app from the marketplace and give it access as required.

Azure Pipelines YML
At this point instead of leveraging the native GitHub Actions 'CodeQL Analysis' workflow we will create an Azure Pipelines YML file in the GitHub repo.
Create a new file in the root of the repo called azure-pipelines.yml.
We start off by defining the trigger on push to main branch and to use ubuntu-latest for the Microsoft hosted ADO agent / runner, which the scan will run on.
trigger:
- main

pool:
  vmImage: 'ubuntu-latest'
Note: the ADO agent is ephemeral so the CodeQL package will be installed on each pipeline execution, if using a self hosted agent consider pre-installing the package to save time and compute resources.
Next, we move down to the jobs section, where we install NodeJS and run the CodeQL scan.
The CodeQL_CLI job uses an ADO PowerShell task to checkout the excellent David Wiggs's CodeQL Anywhere repo as a Git submodule.
jobs:
# install Node
- job: NodeJS

# left out for brevity

# Run CodeQL
- job: CodeQL_CLI
  displayName: CodeQL Scan
  dependsOn: NodeJS

  # Use PowerShell to checkout CodeQL Anywhere repo as a sub module
  steps:
  - task: PowerShell@2
    displayName: 'Checkout codeql-anywhere'
    inputs:
      targetType: inline
      script: |
        if (Test-Path './.git/modules/codeql-anywhere') {rm -rf './.git/modules/codeql-anywhere'}
        git submodule add https://github.com/david-wiggs/codeql-anywhere.git
      pwsh: true
With this submodule in place the latest CodeQL bundle is retrieved via API from the public CodeQL Action repo.
The next PowerShell task runs the CodeQL scan and sends the results back to GitHub as a SARIF file.
 # Use PowerShell to run the CodeQL scan & return SARIF results to GitHub
  - task: PowerShell@2
    displayName: 'Run New-CodeQLScan.ps1'
    inputs:
      targetType: filePath
      filePath: 'codeql-anywhere/resources/scripts/New-CodeQLScan.ps1'
      pwsh: true
    env:
      # GITHUB_TOKEN environment variable must be set to pass in the secret value defined in the $(GHAS_ADO) ADO pipeline variable
      GITHUB_TOKEN: $(GHAS_ADO)
The CodeQL CLI needs permission to detect the repo languages and upload the results back to GitHub. The Azure Pipelines GitHub app doesn't have enough scope for this so we need to Generate a token for authentication with GitHub.
In this case we can use a Personal access Token (PaT) with full repo & security_events permissions. This needs to be saved as an ADO pipelines secret variable in the UI so the pipeline can access it (not as a GitHub repo secret). The code above then stores in the GITHUB_TOKEN Environment Variable to be passed to the CodeQL-Anywhere scan.

The complete azure-pipelines.yml file can be found at the link below 👇
Azure DevOps Project
We now need to create an ADO project to execute the Azure Pipeline we just created.
This is easily done by using your GitHub account to create a free ADO organisation.
Once you have an ADO project ready you can then create a new Azure Pipeline through the UI.
If you connect to GitHub > Select a Repository > Existing Azure Pipelines YAML file then the integration should be successful (uses the GitHub app).


Once complete you should end up with a code view of the azure-pipelines.yml file we created in GitHub earlier (don't forget to add your PaT as an ADO pipelines secret variable).

Time to Scan
OK now we have everything set up it's time to scan our code for vulnerabilities!
As the scan is triggered on push to main you can go ahead and commit to the GitHub repo. Once you do this you'll see the ADO pipeline build is automatically detected and surfaced in the GitHub UI.

If you click through to the details you will be context linked direct to the ADO pipeline to view the Code Scanning job and real time logs. Here you can also see the source of the code repo and commit hash from GitHub.

Once the ADO job is completed we can see in the logs that the CodeQL scan successfully analysed 34 lines of JavaScript code and uploaded the SARIF results back to GitHub.

We can verify this and check out the results by going back to our GitHub repo security tab and see if any alerts have been generated.
As we can see in this example, 3 code scanning alerts have been opened for review and remediation.

Going into each alert then gives you all the information on where the vulnerability was found, what CodeQL rule it violated, the relevant CWE, steps to remediate and options to dismiss or create an Issue for backlog tracking.

You can also check the status of your Code QL set up, to see last scan time and download a CSV report.

As this is using the CodeQL API via Azure Pipelines it's listed as 'API Upload'.

Wrap Up

Congratulations for getting this far and integrating GitHub Advanced Security Code Scanning into your ADO pipelines!
This shows how you can keep the source of truth in your GitHub repo whilst still using your existing CI system to run your security scans and send the results back to GitHub.
Once you are ready to fully embrace Actions as your CI & automation platform then check out the links below 👇
- GitHub Actions vs Azure Pipelines
- MS Learn - Configure code scanning on GitHub
- Sample GitHub repo
- Sample ADO project
Many thanks for reading 🙏
Keep on learning!


